/


搜索到
299
篇与
的结果
-
 欧拉系统openEuler 25.03安装Zabbix7.2.7 欧拉系统openEuler 25.03安装Zabbix7.2.71. 安装依赖dnf -y install telnet net-tools python-paramiko dejavu-sans-fonts python-setuptools sendmail mailx net-snmp net-snmp-devel net-snmp-utils freetype-devel libpng-devel perl unbound OpenIPMI unixODBC libevent-devel mysql-devel libxml2-devel libssh2-devel OpenIPMI-devel openldap-devel curl-devel unixODBC-devel wget gcc gcc-c++ go2. 添加用户groupadd --system zabbix useradd --system -g zabbix -s /sbin/nologin -c "Zabbix Monitoring System" zabbix3. 导入数据mysql -uzabbix -pzabbix zabbix < schema.sql mysql -uzabbix -pzabbix zabbix < images.sql mysql -uzabbix -pzabbix zabbix < data.sql4. 编译安装 7.x./configure prefix=/usr/local/zabbix --enable-server --enable-agent --with-mysql --enable-ipv6 --with-net-snmp --with-libcurl --with-libxml2 --with-openipmi --with-ares5. 配置启动脚本cp misc/init.d/fedora/core/zabbix_server /etc/rc.d/init.d/ cp misc/init.d/fedora/core/zabbix_agentd /etc/rc.d/init.d/ chmod +x /etc/rc.d/init.d/zabbix_server chmod +x /etc/rc.d/init.d/zabbix_agentd6. 配置web界面复制到WEB服务器cp -R /root/zabbix-7.2.7/ui/* /var/html/zabbix/输入访问地址安装zabbixhttp://ip:port/zabbix/默认账号: Admin 密码 zabbix
 -
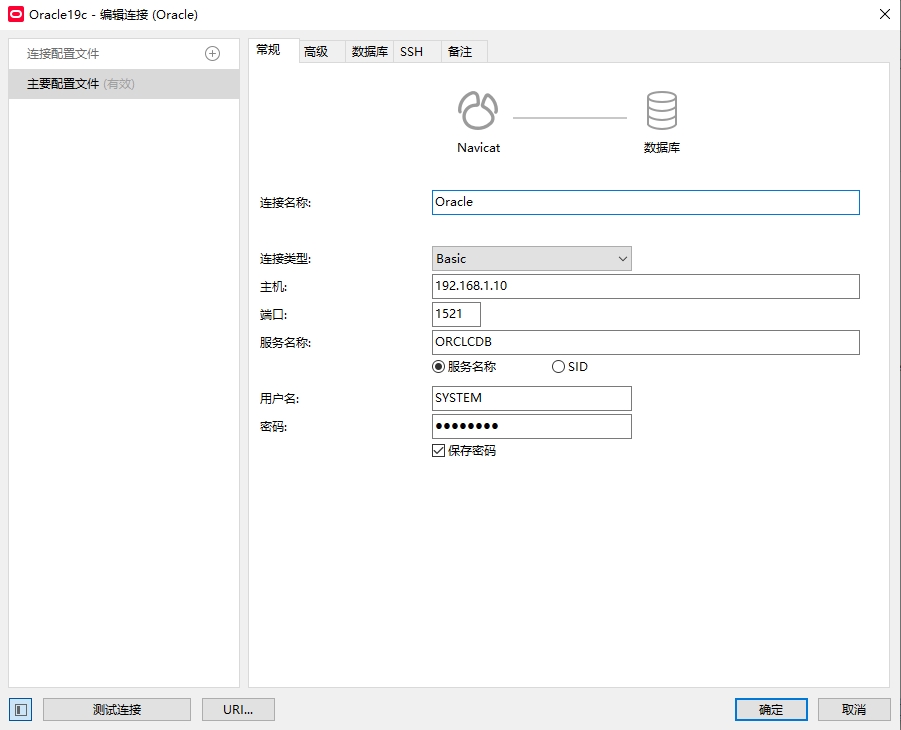
欧拉系统openEuler 25.03安装Oracle 19c 欧拉系统openEuler 25.03安装Oracle 19c数据库:oracle-database-ee-19c-1.0-1.x86_64.rpm oracle-database-preinstall-19c-1.0-1.el7.x86_64 compat-libcap1-1.10-1.x86_64.rpm compat-libstdc++-33-3.2.3-61.x86_64安装依赖dnf install -y bc binutils elfutils-libelf elfutils-libelf-devel glibc glibc-devel ksh libaio libaio-devel libXrender libX11 libXau libXi libXtst libgcc libnsl librdmacm libstdc++ libstdc++-devel libxcb libibverbs make policycoreutils policycoreutils-python-utils smartmontools sysstat psmisc lsof libnsl libnsl2 vim net-tools openssl-devel rpm -vih compat-libcap1-1.10-7.el7.x86_64.rpm compat-libstdc++-33-3.2.3-72.el7.x86_64.rpm rm -rf compat-libcap1-1.10-7.el7.x86_64.rpm compat-libstdc++-33-3.2.3-72.el7.x86_64.rpm创建用户组groupadd oinstall groupadd dba groupadd oper useradd -g oinstall -G dba,oper oracle配置系统参数/etc/sysctl.conffs.aio-max-nr = 1048576 fs.file-max = 6815744 kernel.shmall = 2097152 kernel.shmmax = 536870912 kernel.shmmni = 4096 kernel.sem = 250 32000 100 128 net.ipv4.ip_local_port_range = 9000 65500 net.core.rmem_default = 262144 net.core.rmem_max = 4194304 net.core.wmem_default = 262144 net.core.wmem_max = 1048576 配置系统限制参数 /etc/security/limits.conforacle soft nproc 2047 oracle hard nproc 16384 oracle soft nofile 1024 oracle hard nofile 65536 oracle soft stack 10240 oracle soft core unlimited oracle hard core unlimited oracle soft memlock 50000000 oracle hard memlock 50000000安装Oracle数据库rpm -ivh --nodeps oracle-database-preinstall-19c-1.0-1.el7.x86_64.rpm rpm -ivh oracle-database-ee-19c-1.0-1.x86_64.rpm 初始化实例/etc/init.d/oracledb_ORCLCDB-19c configure配置环境变量export TMP=/tmp export TMPDIR=$TMP export ORACLE_SID=ORCLCDB export ORACLE_BASE=/opt/oracle export ORACLE_HOME=$ORACLE_BASE/product/19c/dbhome_1 export INVENTORY_LOCATION=/opt/oracle/oraInventory export TNS_ADMIN=$ORACLE_HOME/network/admin export LD_LIBRARY_PATH=$ORACLE_HOME/lib #export NLS_LANG="SIMPLIFIED CHINESE_CHINA.ZHS16GBK" export NLS_DATE_FORMAT="YYYY-MM-DD HH24:MI:SS" export PATH=$ORACLE_HOME/bin:/bin:/usr/bin:/usr/sbin:/usr/local/bin:/usr/X11R6/bin:$PATH:$HOME/binsqlplus连接数据库sqlplus / as sysdba # 修改密码 alter user sys identified by oracle;Navicat连接数据库
-
VMware安装OpenEuler25.03 VMware安装OpenEuler25.03openEuler是一款开源操作系统。当前openEuler内核源于Linux,支持鲲鹏及其他多种处理器,能够充分释放计算芯片的潜能,是由全球开源贡献者构建的高效、稳定、安全的开源操作系统,适用于数据库、大数据、云计算、人工智能等应用场景。同时,openEuler是一个面向全球的操作系统开源社区,通过社区合作,打造创新平台,构建支持多处理器架构、统一和开放的操作系统,推动软硬件应用生态繁荣发展。一、安装过程1.1 安装1.2 选择安装语言1.3 分区1.4 选择安装软件1.5 是否启用root1.6 设置时区1.7 安装结束 重启系统
-
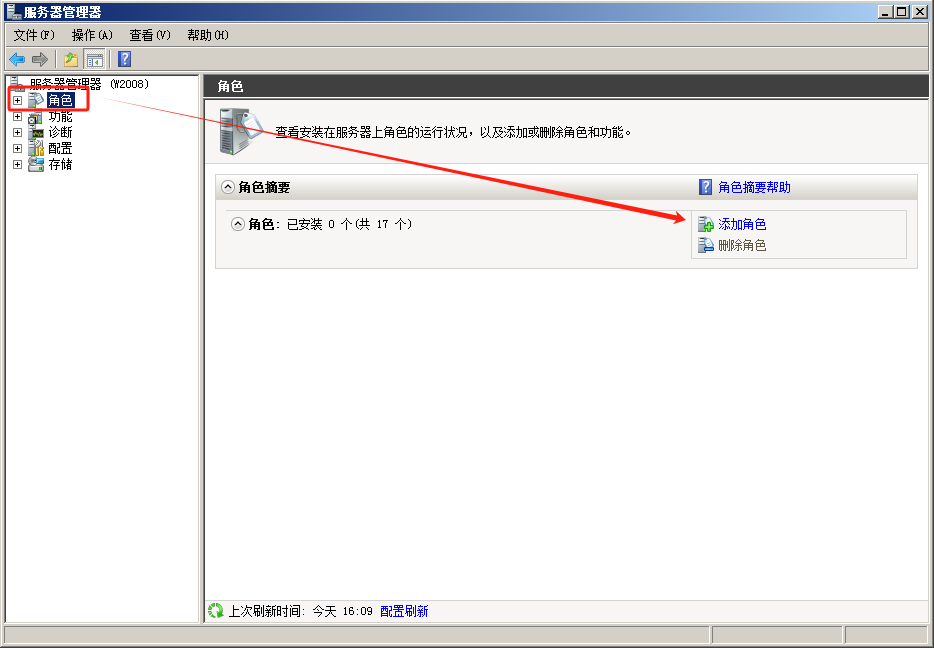
Windows Server 2008安装远程桌面 Windows Server 2008安装远程桌面一、打开服务器管理器1.1 添加角色1.2 选择 远程桌面服务安装完成,重启服务器.二、远程桌面服务器授权控制面板-管理工具-远程桌面服务-远程桌面授权管理器2.1 打开远程桌面授权管理器2.2 运行许可证安装向导2.3 选择企业协议2.4 企业协议号2.5 基本配置2.6 关闭远程桌面,自动结束会话有时,希望用户一关闭远程桌面,就会自动的结束掉会话,可以修改注册表:Windows Registry Editor Version 5.00 [HKEY_LOCAL_MACHINE\SYSTEM\CurrentControlSet\Control\Terminal Server\WinStations\RDP-Tcp] "MaxDisconnectionTime"=dword:000003e8MaxDisconnectionTime 默认采用毫秒为单位,3e8就是1000毫秒,也就是1秒,当用户一关闭远程桌面时,会自动结束掉会话,其它用户再连接时,就不会串到已登陆用户的桌面。
-
CentOS 7.9 安装 Jira8.22 CentOS 7.9 安装 Jira8.22Jira 是什么?Jira 是首屈一指的敏捷项目管理工具,团队可使用该工具放心地规划、跟踪、发布和支持出色的软件。它是您整个开发生命周期的单一事实来源,为自主团队提供情景信息,助力团队在与更大的业务目标保持关联的同时快速采取行动。无论是用于管理简单的项目,还是用于支持 DevOps 实践,Jira 都能让团队轻松推进工作、保持一致并在情境中进行沟通。1. 安装MySQL 8.0.12rpm -ivh mysql-8.0.12-1.el7.x86_64.rpm source /etc/profile.d/mysql.sh2.配置root密码# mysql root 密码为空,先配置root密码 ALTER USER 'root'@'localhost' IDENTIFIED WITH mysql_native_password BY 'root123' PASSWORD EXPIRE NEVER; flush privileges;3. 创建Jira数据库mysql> CREATE DATABASE jira CHARACTER SET utf8mb4 collate utf8mb4_0900_ai_ci; Query OK, 1 row affected (0.00 sec) mysql> CREATE USER 'jira'@'localhost'; Query OK, 0 rows affected (0.00 sec) mysql> ALTER USER 'jira'@'localhost' IDENTIFIED WITH mysql_native_password BY 'jira123'; Query OK, 0 rows affected (0.00 sec) mysql> GRANT ALL PRIVILEGES ON jira.* TO 'jira'@'localhost' WITH GRANT OPTION; Query OK, 0 rows affected, 1 warning (0.00 sec) mysql> CREATE USER 'jira'@'127.0.0.1'; Query OK, 0 rows affected (0.00 sec) mysql> ALTER USER 'jira'@'127.0.0.1' IDENTIFIED WITH mysql_native_password BY 'root123'; Query OK, 0 rows affected (0.00 sec) mysql> GRANT ALL PRIVILEGES ON jira.* to 'root'@'127.0.0.1' WITH GRANT OPTION; Query OK, 0 rows affected (0.00 sec) mysql> FLUSH PRIVILEGES; Query OK, 0 rows affected (0.00 sec)4. 修改my.cnf[mysqld] ... default-storage-engine=INNODB ... [mysqld] ... character_set_server=utf8mb4 ... [mysqld] ... innodb_default_row_format=DYNAMIC ... [mysqld] ... innodb_redo_log_capacity=4G ... innodb_redo_log_capacityinnodb_log_file_sizeinnodb_log_files_in_group sql_mode = NO_AUTO_VALUE_ON_ZERO5.安装Jira[root@localhost ~]# sudo ./atlassian-jira-software-8.22.0-x64.bin Unpacking JRE ... Starting Installer ... This will install Jira Software 8.22.0 on your computer. OK [o, Enter], Cancel [c] Click Next to continue, or Cancel to exit Setup. Choose the appropriate installation or upgrade option. Please choose one of the following: Express Install (use default settings) [1], Custom Install (recommended for advanced users) [2, Enter], Upgrade an existing Jira installation [3] 2 Select the folder where you would like Jira Software to be installed. Where should Jira Software be installed? [/opt/atlassian/jira] Default location for Jira Software data [/var/atlassian/application-data/jira] Configure which ports Jira Software will use. Jira requires two TCP ports that are not being used by any other applications on this machine. The HTTP port is where you will access Jira through your browser. The Control port is used to startup and shutdown Jira. Use default ports (HTTP: 8080, Control: 8005) - Recommended [1, Enter], Set custom value for HTTP and Control ports [2] 2 HTTP Port Number [8080] Control Port Number [8005] Jira can be run in the background. You may choose to run Jira as a service, which means it will start automatically whenever the computer restarts. Install Jira as Service? Yes [y, Enter], No [n] y Details on where Jira Software will be installed and the settings that will be used. Installation Directory: /opt/atlassian/jira Home Directory: /var/atlassian/application-data/jira HTTP Port: 8080 RMI Port: 8005 Install as service: Yes Install [i, Enter], Exit [e] i Extracting files ... Please wait a few moments while Jira Software is configured. Installation of Jira Software 8.22.0 is complete Start Jira Software 8.22.0 now? Yes [y, Enter], No [n] y Please wait a few moments while Jira Software starts up. Launching Jira Software ... Installation of Jira Software 8.22.0 is complete Your installation of Jira Software 8.22.0 is now ready and can be accessed via your browser. Jira Software 8.22.0 can be accessed at http://localhost:8080 Finishing installation ... # 安装完成6.Jira破解说明&安装程序&破解补丁