CentOS 安装 iredMail服务器
系统
[root@mail]# cat /etc/redhat-release
CentOS Linux release 7.9.2009 (Core)
更新系统
yum update -y1. 下载iredMail
下载地址:https://www.iredmail.com/download.html
#CentOS 8 stream
wget https://github.com/iredmail/iRedMail/archive/refs/tags/1.5.2.tar.gz
#CentOS 7
wget https://github.com/iredmail/iRedMail/archive/refs/tags/1.4.2.tar.gz
1.1 其他开源邮件服务器
- EwoMail: 下载地址:http://www.ewomail.com/list-11.html
- 访问地址:
邮箱管理后台:http://IP:8010 (默认账号admin,密码ewomail123)
sl端口 https://IP:7010

web邮件系统:http://IP:8000
ssl端口 https://IP:7000

域名解析完成后,可以用子域名访问,例如下面
http://mail.xxx.com:8000 (http)- DKIM设置:amavisd -c /etc/amavisd/amavisd.conf showkeys
amavisd -c /etc/amavisd/amavisd.conf showkeys- 测试DKIM是否生效:
amavisd -c /etc/amavisd/amavisd.conf testkeys #显示pass正确2.设置主机名
# 检查主机名
[root@localhost ~]# hostname -f
localhost

# 设置主机名
[root@localhost ~]# vim /etc/hosts
[root@localhost ~]# cat /etc/hosts
127.0.0.1   mail.xxx.com localhost localhost.localdomain localhost4 localhost4.localdomain4
[[email protected] ~]# hostnamectl  set-hostname mail.xxx.com
[[email protected] ~]# hostname -f
3. 安装 iredMail
[[email protected] ~]# tar zxf 1.4.2.tar.gz
[[email protected] ~]# cd iRedMail-1.4.2/
[[email protected] iRedMail-1.4.2]# chmod +x iRedMail.sh
[[email protected] iRedMail-1.4.2]# bash iRedMail.sh
4. 安装1.4.2报错: centos 7 不支持 1.5.x
[root@mail iRedMail-1.4.2]# bash iRedMail.sh
[ INFO ] Checking new version of iRedMail ...

<< ERROR >> Your iRedMail version (1.4.2) is out of date, please
<< ERROR >> download the latest version and try again:
<< ERROR >> http://www.iredmail.org/download.html

# 解决方法: 编辑pkgs目录下的get_all.sh 277行, 注释该行
[ X"${CHECK_NEW_IREDMAIL}" != X'NO' ] && \
277     #check_status_before_run check_new_iredmail
5. 根据提示安装
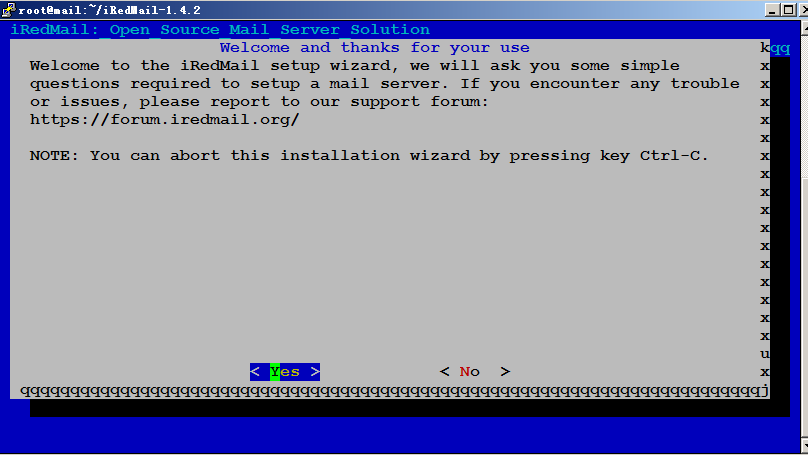
- 5.1 选择 yes
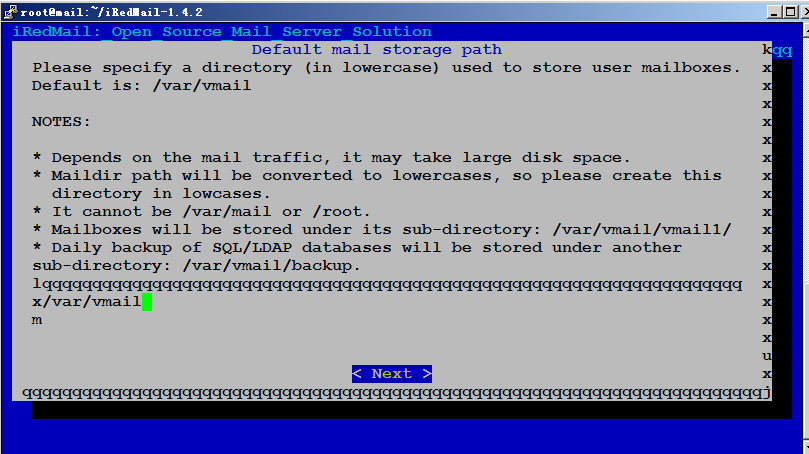
- 5.2 设置邮件目录
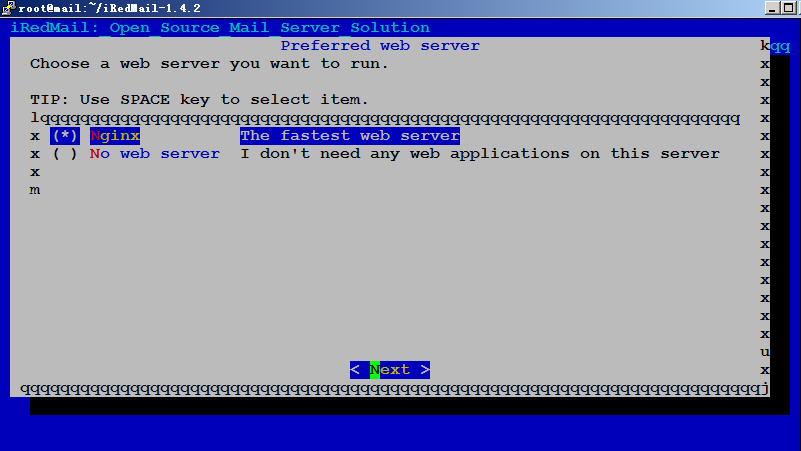
- 5.3 选择安装web服务器
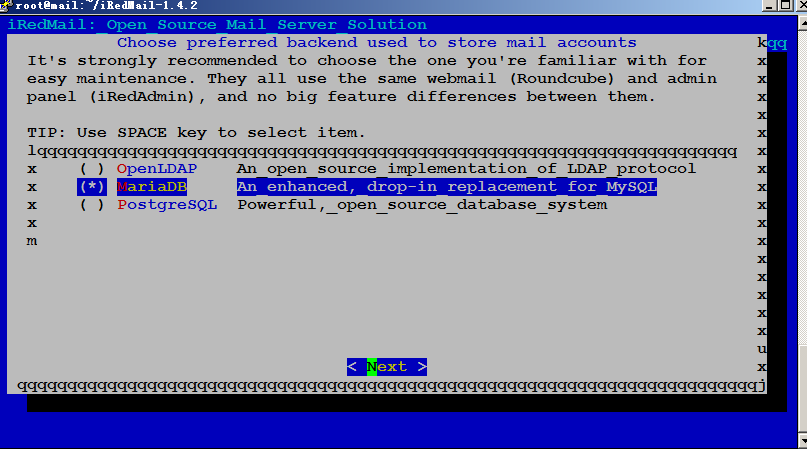
- 5.4 选择安装数据库
- 5.5 设置数据库密码
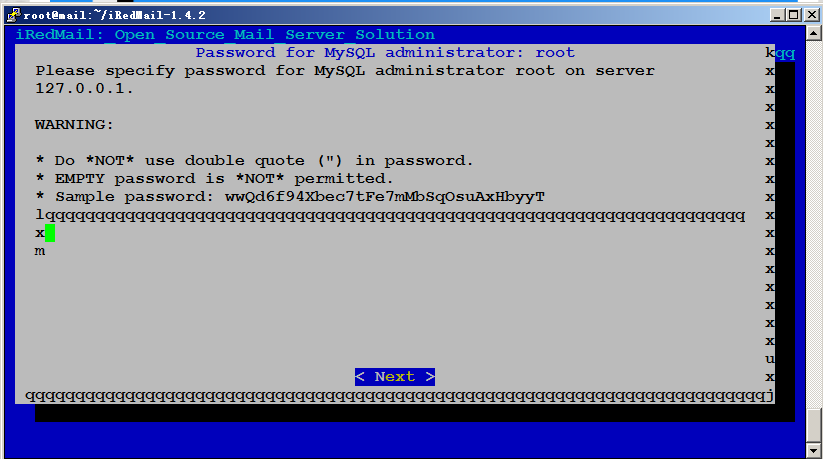
- 5.6 设置邮箱域名
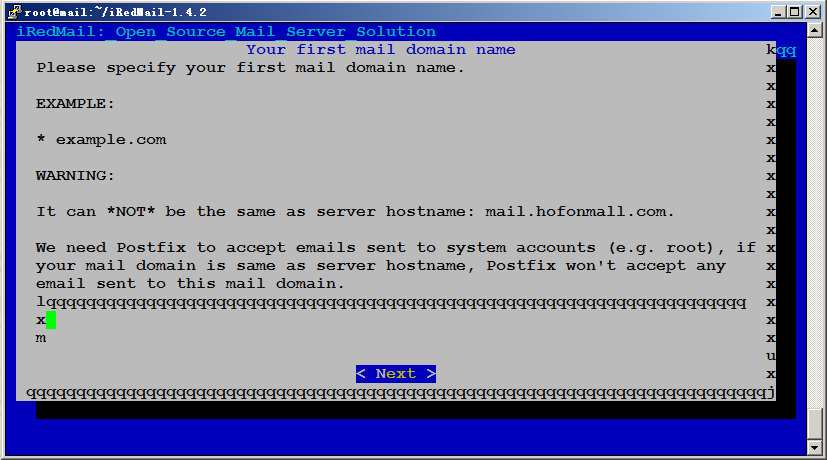
- 5.7 设置邮箱管理员密码
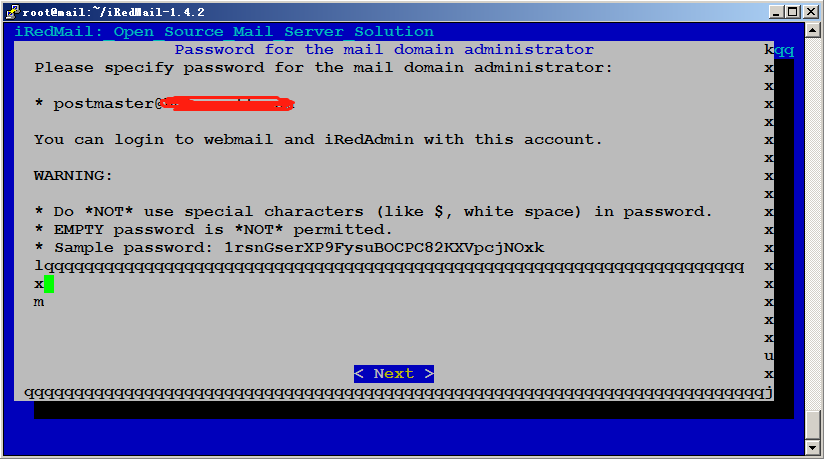
- 5.8 选择需要安装的功能: 默认即可
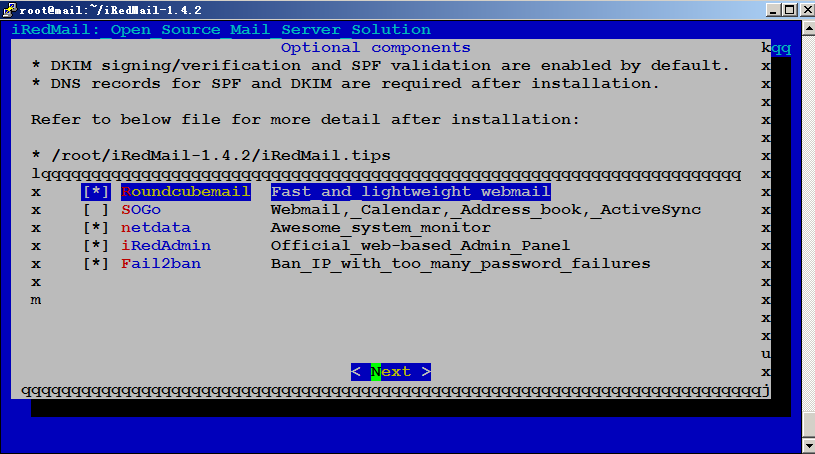
- 5.9 输入y安装
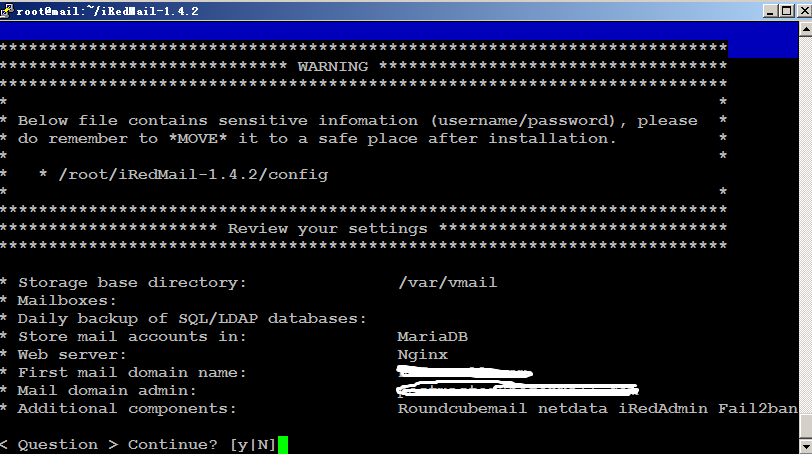
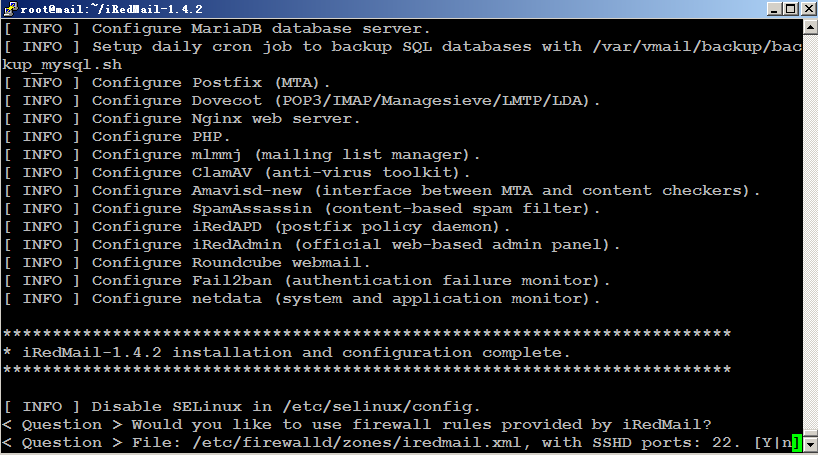
- 5.10 设置SSH端口号:选择n 默认即可
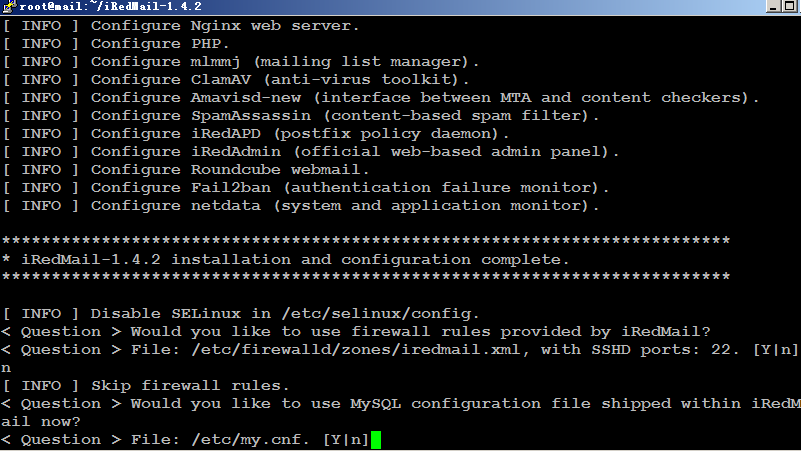
- 5.11 数据库配置文件
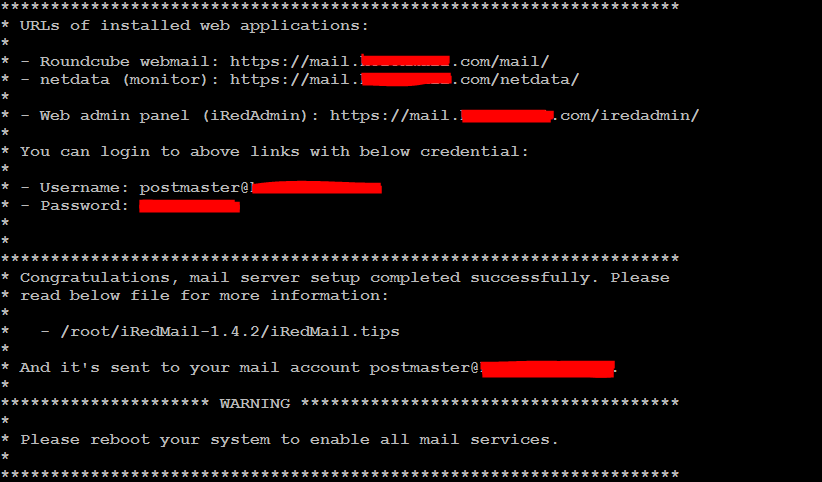
- 5.12 安装完成
5.13 配置SSL证书
wget https://github.com/acmesh-official/acme.sh/archive/refs/tags/3.0.4.zip
./acme.sh --register-account -m [email protected]

./acme.sh --issue -d mail.xxx.com --webroot /var/www/html
./acme.sh --installcert -d mail.xxx.com --key-file /etc/ssl/private/iRedMail.key --fullchain-file
/etc/ssl/certs/iRedMail.crt
5.14 重启服务
service postfix reload;service dovecot reload;service nginx reload- 5.15 禁用iRedMail灰名单
灰名单(greylist)是一项防止垃圾邮件的功能,iRedMail默认开启了该功能。但是,该功能开启之后,收所有信件的时候都有较长时间的延迟。因此,我们建议这里将该功能关闭。
chmod +w /opt/iredapd/settings.py编辑文件 /opt/iredapd/settings.py
plugins = ["reject_null_sender", "wblist_rdns", "reject_sender_login_mismatch", "greylisting", "throttle", "amavisd_wblist", "sql_alias_access_policy"]将其中的”greylisting”删去,重启iredapd, 并且恢复文件权限。
service iredapd restart
chmod -w /opt/iredapd/settings.py- 5.16 配置 SPF, DMARC, DKIM 记录
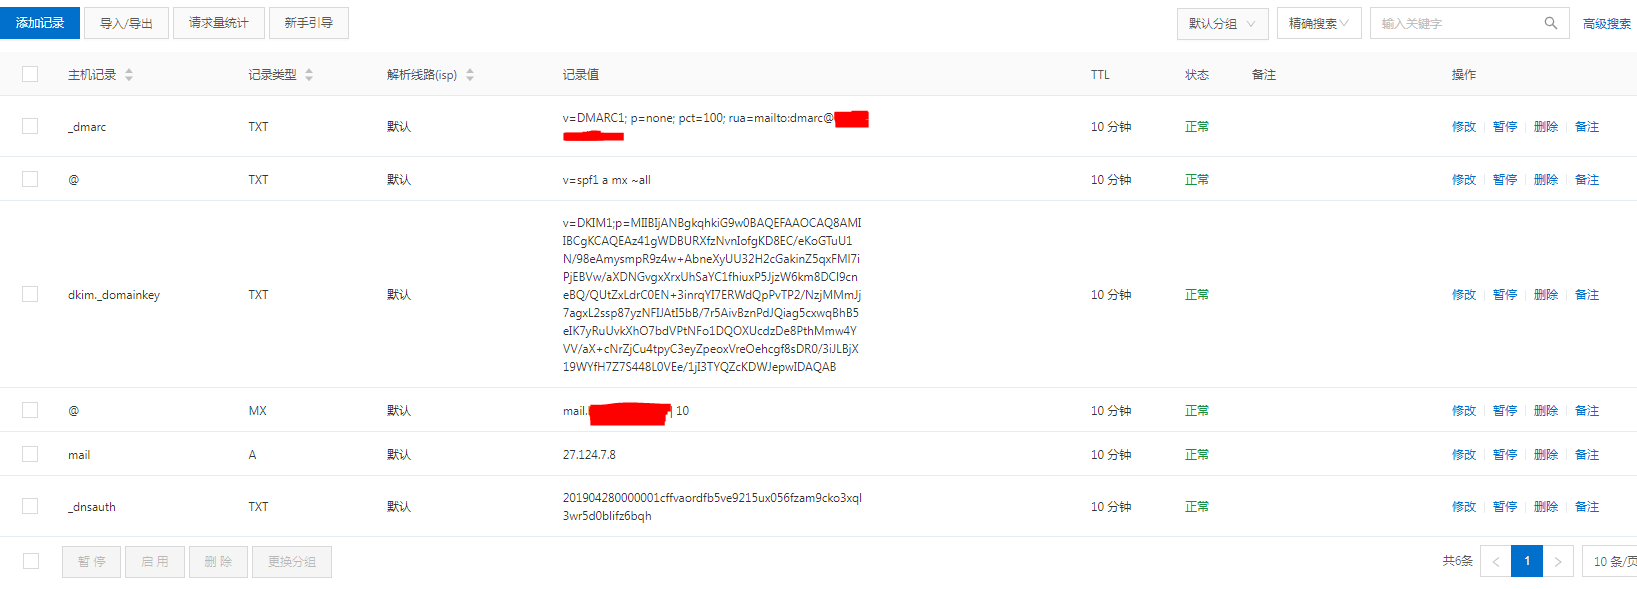
spf 记录:
v=spf1 a mx ~alldmarc记录:
v=DMARC1; p=quarantine;rua=mailto:[email protected];ruf=mailto:[email protected]
#或
v=DMARC1; p=none; pct=100; rua=mailto:[email protected]
dkim记录:
v=DKIM1;p=;MIIBIjANBgkqhkiG9w0BAQEFAAOCAQ8AMIIBCgKCAQEAz41gWDBURXfzNvnIofgKD8EC/eKoGTuU1N/98eAmysmpR9z4w+AbneXyUU32H2cGakinZ5qxFMl7iPjEBVw/aXDNGvgxXrxUhSaYC1fhiuxP5JjzW6km8DCl9cneBQ/QUtZxLdrC0EN+3inrqYI7ERWdQpPvTP2/NzjMMmJj7agxL2ssp87yzNFIJAtI5bB/7r5AivBznPdJQiag5cxwqBhB5eIK7yRuUvkXhO7bdVPtNFo1DQOXUcdzDe8PthMmw4YVV/aX+cNrZjCu4tpyC3eyZpeoxVreOehcgf8sDR0/3iJLBjX19WYfH7Z7S448L0VEe/1jI3TYQZcKDWJe;pwIDAQAB- 5.17 邮件测试
https://www.mail-tester.com/
https://tools.wordtothewise.com/authentication
https://scanmy.email/
-5.18 发送邮件报错: Helo command rejected: ACCESS DENIED
May 16 08:49:35 mail postfix/smtpd[25697]: NOQUEUE: reject: RCPT from out162-62-57-87.mail.qq.com[162.62.57.87]: 554 5.7.1 <out162-62-57-87.mail.qq.com>: Helo command rejected: ACCESS DENIED. Your email was rejected because the sending mail server appears to be on a dynamic IP address that should not be doing direct mail delivery (162-62-57-87); from=<[email protected]> to=<[email protected]> proto=ESMTP helo=<out162-62-57-87.mail.qq.com>解决方法: 编辑 /etc/postfix/main.cf 注释 helo_access.pcre
smtpd_helo_restrictions =
    permit_mynetworks
    permit_sasl_authenticated
    #check_helo_access pcre:/etc/postfix/helo_access.pcre
    reject_non_fqdn_helo_hostname
    reject_unknown_helo_hostname
5.18 启用端口号 25
Enable smtp authentication by uncommenting settings below in Postfix config file /etc/postfix/main.cf (Linux/OpenBSD) or /usr/local/etc/postfix/main.cf (FreeBSD):smtpd_sasl_auth_enable = yes smtpd_sasl_security_options = noanonymous smtpd_tls_auth_only = yes- 5.19 启用 SMTPS 服务(SMTP over SSL,端口 465)
从 iRedMail-1.5.0 开始,默认启用 smtps。
如何启用 SMTPS
要启用 SMTPS,您应该先将 Postfix 配置为监听 465 端口,然后在 iptables 中打开 465 端口。
请在 Postfix 配置文件/etc/postfix/master.cf(Linux/OpenBSD) 或/usr/local/etc/postfix/master.cf(FreeBSD) 中附加以下行:
465     inet  n       -       n       -       -       smtpd
  -o syslog_name=postfix/smtps
  -o smtpd_tls_wrappermode=yes
  -o smtpd_sasl_auth_enable=yes
  -o smtpd_client_restrictions=permit_sasl_authenticated,reject
  -o content_filter=smtp-amavis:[127.0.0.1]:10026
重新启动 Postfix 服务以启用 SMTPS。
警告:请确保您有 Amavisd 监听端口 10026(和 10024、9998)。
465在防火墙中打开端口
在 RHEL/CentOS 上
在 RHEL/CentOS 6 上,请更新 iptables 规则文件/etc/sysconfig/iptables,为端口 465 添加一条规则(下面代码中的第三行),然后重新启动 iptables 服务。
# Part of file: /etc/sysconfig/iptables
-A INPUT -p tcp --dport 25 -j ACCEPT
-A INPUT -p tcp --dport 587 -j ACCEPT
-A INPUT -p tcp --dport 465 -j ACCEPT
在 RHEL/CentOS 7 上,请添加文件/etc/firewalld/services/smtps.xml,内容如下
<?xml version="1.0" encoding="utf-8"?>
<service>
  <short>Enable SMTPS</short>
  <description>Enable SMTPS.</description>
  <port protocol="tcp" port="465"/>
</service>
更新文件,通过在块内/etc/firewalld/zones/iredmail.xml插入行来启用 smtps 服务,如下所示:
<zone>
    ...
    <service name="smtps"/>
</zone>
重启firewalld服务:
# firewall-cmd --complete-reload在 Debian/Ubuntu 上
表格
nftables在 Debian/Ubuntu 上使用最新的 iRedMail 版本,你可以找到它的配置文件/etc/nftables.conf,在提交的行下添加端口 465(端口 587,下例中的第 3 行),如下所示:
        # smtp/submission
        tcp dport 25 accept
        tcp dport 587 accept
        tcp dport 465 accept
需要重启nftables服务。
iptables
旧的 iRedMail 版本在 Debian/Ubuntu 上使用 iptables,你可以找到 iptables 规则文件/etc/default/iptables,请在 465 端口添加一条规则(下面代码中的第三行),然后重新启动 iptables 服务。
# Part of file: /etc/default/iptables
-A INPUT -p tcp --dport 25 -j ACCEPT
-A INPUT -p tcp --dport 587 -j ACCEPT
-A INPUT -p tcp --dport 465 -j ACCEPT
需要重启iptables服务。
iptables-restore < /etc/default/iptables5.20 允许没有 STARTTLS 的不安全 POP3/IMAP/SMTP 连接
使用默认的 iRedMail 设置,所有客户端都必须通过 STARTTLS 使用 POP3/IMAP/SMTP 服务以实现安全连接。如果您的邮件客户端尝试通过不支持 TLS 的协议 POP3/IMAP 访问邮箱,您将收到如下错误消息:Plaintext authentication disallowed on non-secure (SSL/TLS) connections
允许不安全的 POP3/IMAP 连接
如果您出于某种原因(同样不推荐)想要在没有 STARTTLS 的情况下启用 POP3/IMAP 服务,请在 Dovecot 配置文件中更新以下两个参数/etc/dovecot/dovecot.conf并重新启动 Dovecot 服务:
在 Linux 和 OpenBSD 上,它是/etc/dovecot/dovecot.conf
在 FreeBSD 上,它是/usr/local/etc/dovecot/dovecot.conf
disable_plaintext_auth=no
ssl=yes
同样,强烈建议仅使用 POP3S/IMAPS 以获得更好的安全性。
iRedMail 配置的默认和推荐设置是:
disable_plaintext_auth=yes
ssl=required
允许端口 25 上的不安全 SMTP 连接
请在 Postfix 配置文件中注释掉下面的行/etc/postfix/main.cf 并重新加载或重新启动 Postfix 服务:
smtpd_sasl_auth_enable = yes
smtpd_sasl_security_options = noanonymous

# force all clients to use secure connection through port 25
#smtpd_tls_auth_only=yes
\********************************************************************
\* URLs of installed web applications:
\*
\* - Roundcube webmail: https://mail.xxx.com/mail/
\* - netdata (monitor): https://mail.xxx.com/netdata/
\*
\* - Web admin panel (iRedAdmin): https://mail.xxx.com/iredadmin/
\*
\* You can login to above links with below credential:
\*
* - Username: [email protected]
* - Password: 密码
*
*
********************************************************************
* Congratulations, mail server setup completed successfully. Please
* read below file for more information:
*
* - /root/iRedMail-1.4.2/iRedMail.tips
*
* And it's sent to your mail account [email protected].
*
********************* WARNING **************************************
*
* Please reboot your system to enable all mail services.
*
********************************************************************
Admin of domain xxx.com:
* Account: [email protected]
* Password: xxx
You can login to iRedAdmin with this account, login name is full email address.
First mail user:
* Username: [email protected]
* Password: xxx
* SMTP/IMAP auth type: login
* Connection security: STARTTLS or SSL/TLS
You can login to webmail with this account, login name is full email address.
* Enabled services: rsyslog postfix mysql nginx php7.3-fpm dovecot clamav-daemon amavis clamav-freshclam fail2ban cron nftables
SSL cert keys (size: 4096):
- /etc/ssl/certs/iRedMail.crt
- /etc/ssl/private/iRedMail.key
Mail Storage:
- Mailboxes: /var/vmail/vmail1
- Mailbox indexes:
- Global sieve filters: /var/vmail/sieve
- Backup scripts and backup copies: /var/vmail/backup
MySQL:
* Root user: root, Password: "xxx" (without quotes)
* Bind account (read-only):
- Username: vmail, Password: xxxx
* Vmail admin account (read-write):
- Username: vmailadmin, Password: xxxx
* Config file: /etc/mysql/my.cnf
* RC script: /etc/init.d/mysql
Virtual Users:
- /root/iRedMail-1.3.2/samples/iredmail/iredmail.mysql
- /root/iRedMail-1.3.2/runtime/*.sql
Backup MySQL database:
* Script: /var/vmail/backup/backup_mysql.sh
* See also:
# crontab -l -u root
Postfix:
* Configuration files:
- /etc/postfix
- /etc/postfix/aliases
- /etc/postfix/main.cf
- /etc/postfix/master.cf
* SQL/LDAP lookup config files:
- /etc/postfix/mysql
Dovecot:
* Configuration files:
- /etc/dovecot/dovecot.conf
- /etc/dovecot/dovecot-ldap.conf (For OpenLDAP backend)
- /etc/dovecot/dovecot-mysql.conf (For MySQL backend)
- /etc/dovecot/dovecot-pgsql.conf (For PostgreSQL backend)
- /etc/dovecot/dovecot-used-quota.conf (For real-time quota usage)
- /etc/dovecot/dovecot-share-folder.conf (For IMAP sharing folder)
* Syslog config file:
- /etc/rsyslog.d/1-iredmail-dovecot.conf (present if rsyslog >= 8.x)
* RC script: /etc/init.d/dovecot
* Log files:
- /var/log/dovecot/dovecot.log
- /var/log/dovecot/sieve.log
- /var/log/dovecot/lmtp.log
- /var/log/dovecot/lda.log (present if rsyslog >= 8.x)
- /var/log/dovecot/imap.log (present if rsyslog >= 8.x)
- /var/log/dovecot/pop3.log (present if rsyslog >= 8.x)
- /var/log/dovecot/sieve.log (present if rsyslog >= 8.x)
* See also:
- /var/vmail/sieve/dovecot.sieve
- Logrotate config file: /etc/logrotate.d/dovecot
Nginx:
* Configuration files:
- /etc/nginx/nginx.conf
- /etc/nginx/sites-available/00-default.conf
- /etc/nginx/sites-available/00-default-ssl.conf
* Directories:
- /etc/nginx
- /var/www/html
* See also:
- /var/www/html/index.html
php-fpm:
* Configuration files: /etc/php/7.3/fpm/pool.d/www.conf
PHP:
* PHP config file for Nginx:
* Disabled functions: posix_uname,eval,pcntl_wexitstatus,posix_getpwuid,xmlrpc_entity_decode,pcntl_wifstopped,pcntl_wifexited,pcntl_wifsignaled,phpAds_XmlRpc,pcntl_strerror,ftp_exec,pcntl_wtermsig,mysql_pconnect,proc_nice,pcntl_sigtimedwait,posix_kill,pcntl_sigprocmask,fput,phpinfo,system,phpAds_remoteInfo,ftp_login,inject_code,posix_mkfifo,highlight_file,escapeshellcmd,show_source,pcntl_wifcontinued,fp,pcntl_alarm,pcntl_wait,ini_alter,posix_setpgid,parse_ini_file,ftp_raw,pcntl_waitpid,pcntl_getpriority,ftp_connect,pcntl_signal_dispatch,pcntl_wstopsig,ini_restore,ftp_put,passthru,proc_terminate,posix_setsid,pcntl_signal,pcntl_setpriority,phpAds_xmlrpcEncode,pcntl_exec,ftp_nb_fput,ftp_get,phpAds_xmlrpcDecode,pcntl_sigwaitinfo,shell_exec,pcntl_get_last_error,ftp_rawlist,pcntl_fork,posix_setuid
ClamAV:
* Configuration files:
- /etc/clamav/clamd.conf
- /etc/clamav/freshclam.conf
- /etc/logrotate.d/clamav
* RC scripts:
+ /etc/init.d/clamav-daemon
+ /etc/init.d/clamav-freshclam
Amavisd-new:
* Configuration files:
- /etc/amavis/conf.d/50-user
- /etc/postfix/master.cf
- /etc/postfix/main.cf
* RC script:
- /etc/init.d/amavis
* SQL Database:
- Database name: amavisd
- Database user: amavisd
- Database password: xxxx
DNS record for DKIM support:
; key#1 2048 bits, i=dkim, d=xxx.com, /var/lib/dkim/xxx.com.pem
dkim._domainkey.xxx.com. 3600 TXT (
"v=DKIM1; p="
"MIIBIjANBgkqhkiG9w0BAQEFAAOCAQ8AMIIBCgKCAQEAz41gWDBURXfzNvnIofgK"
"D8EC/eKoGTuU1N/98eAmysmpR9z4w+AbneXyUU32H2cGakinZ5qxFMl7iPjEBVw/"
"aXDNGvgxXrxUhSaYC1fhiuxP5JjzW6km8DCl9cneBQ/QUtZxLdrC0EN+3inrqYI7"
"ERWdQpPvTP2/NzjMMmJj7agxL2ssp87yzNFIJAtI5bB/7r5AivBznPdJQiag5cxw"
"qBhB5eIK7yRuUvkXhO7bdVPtNFo1DQOXUcdzDe8PthMmw4YVV/aX+cNrZjCu4tpy"
"C3eyZpeoxVreOehcgf8sDR0/3iJLBjX19WYfH7Z7S448L0VEe/1jI3TYQZcKDWJe"
"pwIDAQAB")
SpamAssassin:
* Configuration files and rules:
- /etc/mail/spamassassin
- /etc/mail/spamassassin/local.cf
iRedAPD - Postfix Policy Server:
* Version: 4.6
* Listen address: 127.0.0.1, port: 7777
* SQL database account:
- Database name: iredapd
- Username: iredapd
- Password: xxx
* Configuration file:
- /opt/iredapd/settings.py
* Related files:
- /opt/iRedAPD-4.6
- /opt/iredapd (symbol link to /opt/iRedAPD-4.6
iRedAdmin - official web-based admin panel:
* Version: 1.2
* Root directory: /opt/www/iRedAdmin-1.2
* Config file: /opt/www/iRedAdmin-1.2/settings.py
* Web access:
- URL: https://mail.xxx.com/iredadmin/
- Username: [email protected]
- Password: xxx
* SQL database:
- Database name: iredadmin
- Username: iredadmin
- Password: xxxx
Roundcube webmail: /opt/www/roundcubemail-1.4.9
* Config file: /opt/www/roundcubemail-1.4.9/config
* Web access:
- URL: http://mail.xxx.com/mail/ (will be redirected to https:// site)
- URL: https://mail.xxx.com/mail/ (secure connection)
- Username: [email protected]
- Password: xxxx
* SQL database account:
- Database name: roundcubemail
- Username: roundcube
- Password: xxxxx
* Cron job:
- Command: "crontab -l -u root"
netdata (monitor):
- Config files:
- All config files: /opt/netdata/etc/netdata
- Main config file: /opt/netdata/etc/netdata/netdata.conf
- Modified modular config files:
- /opt/netdata/etc/netdata/go.d
- /opt/netdata/etc/netdata/python.d
- HTTP auth file (if you need a new account to access netdata, please
update this file with command like 'htpasswd' or edit manually):
- /etc/nginx/netdata.users
- Log directory: /opt/netdata/var/log/netdata
- SQL:
- Username: netdata
- Password: xxxxx
- NOTE: No database required by netdata.


评论